Hallo zusammen
Bin auf folgende Anleitung gestossen:
https://www.youtube.com/watch?v=1noeu9RMI2o
https://github.com/AmIBeingObtuse/Youtubestacks/blob/main/Nextcloud All In One
Wie kann ich nun die AIO auf Synology Docker ummünzen?
Hab unterdessen versucht die YAML zu importieren, was nicht wirklich funktioniert...
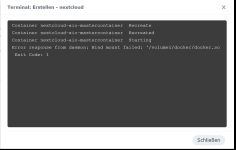
Resultat:

Bin auf folgende Anleitung gestossen:
https://www.youtube.com/watch?v=1noeu9RMI2o
https://github.com/AmIBeingObtuse/Youtubestacks/blob/main/Nextcloud All In One
Wie kann ich nun die AIO auf Synology Docker ummünzen?
Hab unterdessen versucht die YAML zu importieren, was nicht wirklich funktioniert...
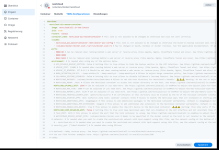
YAML:
services:
  nextcloud-aio-mastercontainer:
    image: nextcloud/all-in-one:latest
    init: true
    restart: always
    container_name: nextcloud-aio-mastercontainer # This line is not allowed to be changed as otherwise AIO will not work correctly
    volumes:
      - nextcloud_aio_mastercontainer:/mnt/docker-aio-config # This line is not allowed to be changed as otherwise the built-in backup solution will not work
      - /volume3/docker/docker.sock:/var/run/docker.sock:ro # May be changed on macOS, Windows or docker rootless. See the applicable documentation. If adjusting, don't forget to also set 'WATCHTOWER_DOCKER_SOCKET_PATH'!
    ports:
      - 9080:80 # Can be removed when running behind a web server or reverse proxy (like Apache, Nginx, Cloudflare Tunnel and else). See https://github.com/nextcloud/all-in-one/blob/main/reverse-proxy.md
      - 8080:8080
      - 8443:8443 # Can be removed when running behind a web server or reverse proxy (like Apache, Nginx, Cloudflare Tunnel and else). See https://github.com/nextcloud/all-in-one/blob/main/reverse-proxy.md
    environment: # Is needed when using any of the options below
      # AIO_DISABLE_BACKUP_SECTION: false # Setting this to true allows to hide the backup section in the AIO interface. See https://github.com/nextcloud/all-in-one#how-to-disable-the-backup-section
      # APACHE_PORT: 11000 # Is needed when running behind a web server or reverse proxy (like Apache, Nginx, Cloudflare Tunnel and else). See https://github.com/nextcloud/all-in-one/blob/main/reverse-proxy.md
      # APACHE_IP_BINDING: 127.0.0.1 # Should be set when running behind a web server or reverse proxy (like Apache, Nginx, Cloudflare Tunnel and else) that is running on the same host. See https://github.com/nextcloud/all-in-one/blob/main/reverse-proxy.md
      # BORG_RETENTION_POLICY: --keep-within=7d --keep-weekly=4 --keep-monthly=6 # Allows to adjust borgs retention policy. See https://github.com/nextcloud/all-in-one#how-to-adjust-borgs-retention-policy
      # COLLABORA_SECCOMP_DISABLED: false # Setting this to true allows to disable Collabora's Seccomp feature. See https://github.com/nextcloud/all-in-one#how-to-disable-collaboras-seccomp-feature
      # NEXTCLOUD_DATADIR: /mnt/ncdata # Allows to set the host directory for Nextcloud's datadir. ⚠️⚠️⚠️ Warning: do not set or adjust this value after the initial Nextcloud installation is done! See https://github.com/nextcloud/all-in-one#how-to-change-the-default-location-of-nextclouds-datadir
      # NEXTCLOUD_MOUNT: /mnt/ # Allows the Nextcloud container to access the chosen directory on the host. See https://github.com/nextcloud/all-in-one#how-to-allow-the-nextcloud-container-to-access-directories-on-the-host
      NEXTCLOUD_UPLOAD_LIMIT: 256G # Can be adjusted if you need more. See https://github.com/nextcloud/all-in-one#how-to-adjust-the-upload-limit-for-nextcloud
      # NEXTCLOUD_MAX_TIME: 3600 # Can be adjusted if you need more. See https://github.com/nextcloud/all-in-one#how-to-adjust-the-max-execution-time-for-nextcloud
      # NEXTCLOUD_MEMORY_LIMIT: 512M # Can be adjusted if you need more. See https://github.com/nextcloud/all-in-one#how-to-adjust-the-php-memory-limit-for-nextcloud
      # NEXTCLOUD_TRUSTED_CACERTS_DIR: /path/to/my/cacerts # CA certificates in this directory will be trusted by the OS of the nexcloud container (Useful e.g. for LDAPS) See See https://github.com/nextcloud/all-in-one#how-to-trust-user-defined-certification-authorities-ca
      # NEXTCLOUD_STARTUP_APPS: deck twofactor_totp tasks calendar contacts notes # Allows to modify the Nextcloud apps that are installed on starting AIO the first time. See https://github.com/nextcloud/all-in-one#how-to-change-the-nextcloud-apps-that-are-installed-on-the-first-startup
      # NEXTCLOUD_ADDITIONAL_APKS: imagemagick # This allows to add additional packages to the Nextcloud container permanently. Default is imagemagick but can be overwritten by modifying this value. See https://github.com/nextcloud/all-in-one#how-to-add-os-packages-permanently-to-the-nextcloud-container
      # NEXTCLOUD_ADDITIONAL_PHP_EXTENSIONS: imagick # This allows to add additional php extensions to the Nextcloud container permanently. Default is imagick but can be overwritten by modifying this value. See https://github.com/nextcloud/all-in-one#how-to-add-php-extensions-permanently-to-the-nextcloud-container
      # NEXTCLOUD_ENABLE_DRI_DEVICE: true # This allows to enable the /dev/dri device in the Nextcloud container. ⚠️⚠️⚠️ Warning: this only works if the '/dev/dri' device is present on the host! If it should not exist on your host, don't set this to true as otherwise the Nextcloud container will fail to start! See https://github.com/nextcloud/all-in-one#how-to-enable-hardware-transcoding-for-nextcloud
      NEXTCLOUD_KEEP_DISABLED_APPS: false # Setting this to true will keep Nextcloud apps that are disabled in the AIO interface and not uninstall them if they should be installed. See https://github.com/nextcloud/all-in-one#how-to-keep-disabled-apps
      # TALK_PORT: 3478 # This allows to adjust the port that the talk container is using. See https://github.com/nextcloud/all-in-one#how-to-adjust-the-talk-port
      # WATCHTOWER_DOCKER_SOCKET_PATH: /var/run/docker.sock # Needs to be specified if the docker socket on the host is not located in the default '/var/run/docker.sock'. Otherwise mastercontainer updates will fail. For macos it needs to be '/var/run/docker.sock'
    # networks: # Is needed when you want to create the nextcloud-aio network with ipv6-support using this file, see the network config at the bottom of the file
      # - nextcloud-aio # Is needed when you want to create the nextcloud-aio network with ipv6-support using this file, see the network config at the bottom of the file
    # security_opt: ["label:disable"] # Is needed when using SELinux

  # # Optional: Caddy reverse proxy. See https://github.com/nextcloud/all-in-one/blob/main/reverse-proxy.md
  # # You can find further examples here: https://github.com/nextcloud/all-in-one/discussions/588
  # caddy:
  #   image: caddy:alpine
  #   restart: always
  #   container_name: caddy
  #   volumes:
  #     - ./Caddyfile:/etc/caddy/Caddyfile
  #     - ./certs:/certs
  #     - ./config:/config
  #     - ./data:/data
  #     - ./sites:/srv
  #   network_mode: "host"

volumes: # If you want to store the data on a different drive, see https://github.com/nextcloud/all-in-one#how-to-store-the-filesinstallation-on-a-separate-drive
  nextcloud_aio_mastercontainer:
    name: nextcloud_aio_mastercontainer # This line is not allowed to be changed as otherwise the built-in backup solution will not work

# # Optional: If you need ipv6, follow step 1 and 2 of https://github.com/nextcloud/all-in-one/blob/main/docker-ipv6-support.md first and then uncomment the below config in order to activate ipv6 for the internal nextcloud-aio network.
# # Please make sure to uncomment also the networking lines of the mastercontainer above in order to actually create the network with docker-compose
# networks:
#   nextcloud-aio:
#     name: nextcloud-aio # This line is not allowed to be changed as otherwise the created network will not be used by the other containers of AIO
#     driver: bridge
#     enable_ipv6: true
#     ipam:
#       driver: default
#       config:
#         - subnet: fd12:3456:789a:2::/64 # IPv6 subnet to use
Resultat:


